Pages

Friday, March 30, 2012

So Many Colours! @_@: Coastal Scents 88 Palette

I'm so excited! I finally received my Coastal Scents 88 Original Palette the day before yesterday! It came in a huge box stuffed with paper and bubble wrap, really well packaged and no damage at all and in less than a month! My postman handed me the box and I squealed! Lol! I think he's wary of me now. -__-
Anyway, on to the palette! I would like to warn you here that this post has a crazy amount of images! Here we go!

They should really do something about that logo and font. .__.
The package had the palette, a few business cards, a I ♥ Make up sticker and a sample of mineral eyeshadow, in "Champagne."

Look at all 'em pretty colours! *u*
Yes, I swatched all of them! From left to right! I'm skipping the first one though because it barely showed up to be picked up by my camera! You can click on images to enlarge btw!
So, from line 2:

The golds are really great!
The yellow is pretty chalky. :(

There are a LOT of blues!
See what I mean? :/
I loved ALL the pinks!
Lol! I think I have 3 different brands with the colour that is 3rd from last!
That last red is so super pigmented! Amazing carmine colour
I love the fact that this palette is a mix of shimmer and matte
That first silver! SPARKLY!

And that's it! You can see how crazy red my arm got after swatching them all! LOL!
Anyway, I played around a bit with the shadows today and I did a few looks.. If they're a bit strange, it's because I hadn't planned them in advance, just went with the flow. I'm happy with the first one though!

Note: These photos are not colour corrected, I only removed the stray hairs in my brows and used some blur on the photo edges. I want you guys to see what these colours really look like (with flash btw)! ^u^

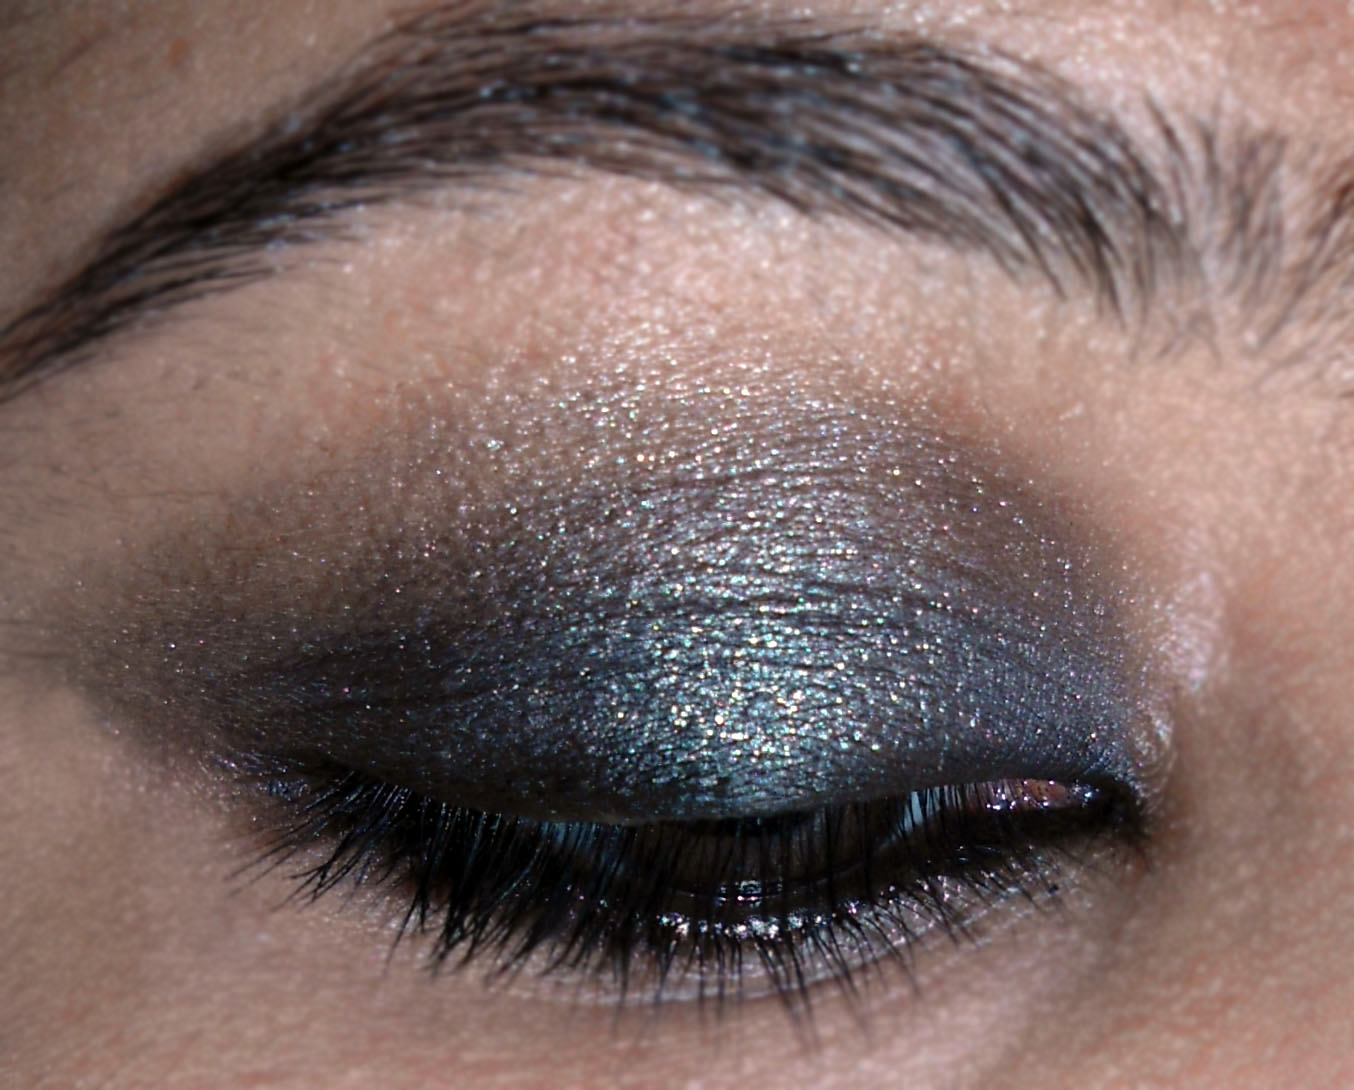
Look 1: I like to call it "Arabian Night." :) My fave look so far! I never noticed how much matte shadows make your skin look smoother as compared to shimmer ones!


Look 2: I call it "Anne Rice's Vampires were Better!" I've never used red eyeshadow before and thought I'd give it a go! Also used the silver here. I love the goth feel of it! The red matches the red in my hair! LOL!


Look 3: I don't have a clever name for this one because it's pretty boring compared to the last two.. It's just pink and gold. Pretty for a wedding. :)


In all, this palette is great! I can see 2-3 chalky shades but when you get 80+ amazing shades, it doesn't matter that much.
Price wise also, this was a good buy, I got it on sale, so with shipping I paid only 1100INR! So if they do have a deal again, I say GO FOR IT!!

That's all I got for now! I'll be doing so many more looks so don't forget to like/ follow for updates. :) Let me know if I should do a tutorial on any of these looks! Because I really would love too. :3

Now, I must go, my grand mum just reminded me that I'm STILL wearing different eyeshadows on my face. LOL! Gotta go wash that off. :) Comments are welcome!


Tealeaf Cafe's Giveaway - 100 Cups of Tea

I'm participating in Tealeaf Cafe's giveaway, the prizes are awesome! Will you take part? :) Click on the image!


Thursday, March 29, 2012

The Lazy Girl's Guide to Smokey Eyes!

If any of you girls out there are like me, you love to laze around and procrastinate.. Well, what happens when we procrastinate too long for say, getting ready for a party? We end up screwing up our make up, BIG TIME!

So, here's a trick I use for smokey party make-up when I've wasted too much time napping or just don't feel like putting in as much effort as I would in getting ready BUT still want to look like I have! *evil laugh*

Awesome, eh? EH??
So here's what you need:
  1. Black eyeliner pencil (I used Max Factor)
  2. Any shimmery shadow (I used the wine colour from Jordana Sultry Eyes Quad)
  3. Mascara (optional, I usually use HyperCurl by Maybelline)
Step 1: If you have the time, prep- prime your eyes, apply the black pencil all over your eye lid, don't go beyond the crease, don't forget to line your lash line and waterline. Then before the pencil sets, blend it out to your crease still keeping the colour solid near the lashes.
Messy doesn't matter at this point.

I just use a disposable blender to blend it out.

Step 2: Take the shimmery shadow and pat it on all over the lid, then blend out towards the brow. Sweep it on the lower lid too! Put on some mascara if required.
Pat it on the eyelid area, then sweep to blend upwards.

AND DONE!! What? You don't believe me?? Really! Done... LOOK:
Excuse my tired eyes, I'm not a morning person. X(

It took me 10 minutes to do one eye with taking pictures. I did my other eye too, took around 3-4 minutes..
I used another shadow to show you guys. :)

Silver shadow from 88 palette. :)
So, are you girls gonna give this look a go? Getting ready for Saturday night just got more efficient! LOL! Have you used this trick before? Or are you going to give it a shot? Let me know with your comments here or on my FB page. :)

Tuesday, March 27, 2012

Hauls for March and Beautyjoint.com Review

I thought I would do a post for all the make up that I bought in March because I had been on hiatus for awhile and didn't get to share the stuff I got. Plus, this way if you guys want any reviews from any of this stuff, you can comment below or on my Facebook page and let me know!

Yesterday an order I made from Beauty Joint arrived, my brilliant mailman just crammed the package into my letter slot! I don't even know how he managed! Anyway, I really recommend shopping with Beauty Joint! They have great brands like NYX, Kleancolor, China Glaze, ELF etc! And they ship the very next day. :)

My order arrived in less than a month! Plus, the wrapping was great! In fact I think everything was packaged a bit too well! Lol! Took me awhile to open it all. -__- Their customer service is really good too! They reply to mails almost immediately. :)

All very "Springy" colours

I got two Cherimoya Crackle polishes in Immortal (the pink) and Flashback (the purple), I also got NYX's round lipstick in Haute Melon! I've been wanting this colour for soo long now! Another thing I got was NYX's matte lipstick in Angel, I love this colour! It is so pretty! I've heard it's a dupe for MAC's Impassioned but I don't know...

Remember I had told you I bought some stuff from Beauty Center as well? Well, here it is!

See! Deborah Lippmann right??


OPI You Don't Know Jacques!
Maybelline Colorama Marinho, I used it with my matte finisher.
NYX Surf ( doesn't the bottle look like Deborah Lippmann? :D) Used here.
Miss Claire Black Crackle (FINALLY BLACK!! ;A;)
Maybelline Colorsensational Lipstick Blushing Brunette
NYX eye/ eybrow pencil Cuivre (Free gift! >u<)
Maybelline Lipliner in Velvet Beige
And all those cute fimo stickers and rhinestones, I used here and here..

That's it for my haul! I have Coastal Scents 88 Palette coming sometime early next month too! *SO IMPATIENT!*  I can't wait!

Hope you liked it! And do let me know if you would like some reviews or swatches for any of these. :) Plus, I've got an eyeshadow tutorial this week, so stay tuned!

Monday, March 26, 2012

Manicure Monday: Kawaii Hello Kitty Nails


On my last trip to Beauty Center I picked up a LOT of nail art stuff like rhinestones and fimo clay stickers. Well, not stickers exactly, just the cut out pieces. I needed nailpolish to stick them on. I used the rhinestones for a prior manicure and I'm using it for this one as well! I picked them up for 50 INR (if I remember correctly.) 

How cute are these? I can't wait to use the pink kitties!
Aren’t they adorable! There were ones with fruits too but I just loved these so much! They’ve been with me for a while now but I decided to do a manicure with them just last week. 

I used Elle 18 pops in 26 for my ring finger and 48 for all the rest. For silver I used NYX's striper polish and Maybelline Express Finish top coat. :)

So here it is! My kawaii* nails! :3


Close-up


*Kawaii is Japanese for cute. ^u^


Singing My Blues~ Faces I-Shine Eyeshadow Quartet Review


I love  blue, it looks great anywhere, on clothes, in hair, in music and even on your eyes! I love it! 

Blue eyeshadows really make brown eyes stand out. Gone are the days when blue eyeshadow was a product of the 80s and 90s evoking strong feelings horror in people (I blame The Drew Carey Show, seriously.)
Yes, I definitely blame it.


Since I love my blues so much, I had picked up the Faces eyeshadow quartet in 2, which happens to be a set of amazing blues! I had shown it to you guys in an initial haul post.
The powders are soft and easy to blend. Being easy to blend they do have *some fall out* but not so much that you can't handle it. 
They are shimmery but not OTT, definitely no chunky sparkles in these.

Price: Rs. 499 (I got mine for a discount though at Beauty Center.)
Expiry: 12 months from opening. Pfft..
Swatch without flash

The colours include:
  • An iridescent light blue with slight purple undertones, great for highlighting when blended carefully.
  • A turquoise like shade that really makes brown eyes look AH-MAZING!
  • A dark navy-ish blue
  • A blue based black that I LOVE even just like that. Great for contouring your crease and lining.


I love mixing these colours with nudes, golds and pinks for some really great looks! And I actually manage to get a lot of use out of these, which I never expected because, well, it’s blue eyeshadow! 

In these images I've used only the quad, some mascara and black eye pencil.


If your looking for a great blue shadow quad, this I think is your best bet! The cost is great, quality is excellent! Only thing I hate is opening the damn thing! I have on more than one occasion broken my nails trying to open it. -__- 
Oh, well. You win some, you lose some.

Yes, I am in my jammies. :3

By the way, do you like my hair colour? :D I decided to go red for a bit to match the heat of the weather these days. ;) The shadow looks very washed out in that image. :( And look no foundation! LOL! I did use some Photoshop to reduce the shine on my nose though. Hehehe...

If you guys would like a tutorial on how I did my eyes here. Let me know! Leave me a comment here or on my FB page. :)


Thursday, March 22, 2012

Failproof, foolproof, Cat/Winged Liner Tutorial of Perfection!


Okay, that title is a bit exaggerated. XD But truthfully, this tutorial is the easiest way to get a winged liner look without it looking like a hook sticking out of your eye, great for beginners! The shape will always compliment your eyes and you can never get this wrong unless you have like serious withdrawal symptoms, i.e. shaky hands. I used to use this way when I first started wearing eyeliner, now i have moved to greater things. *acts self-important*

So this is what we're going for:
Exhibit A: Le *almost* perfect wing

Lets do this! Warning: Onslaught of images may slow your interwebz!
 
  •  Draw a straight line beginning from the end of your lower lid outwards, make sure the line you draw  follows the natural angle of your lower lid, like how I have done, in the direction of the arrow. Try not to tug at your lis to get the line, just draw it on naturally. If you tilt your head back slightly, it is easier.
  • Make sure the line doesn't cross the eyebrow area, if you want to do that... I don't know what to tell you. -__- 


  • Next, from the tip of the line you just drew, bring the eyeliner down in a triangular shape to your upper eyelid in a straight line, as shown above. If it is a little shaky don't worry! Keep handy, your trusty q-tip and make up remover to clean up!  
You should have something like this. :)

  • Now draw on a thin line from the inner corner of the eye and get it to meet the triangle. Build it up if you like. 
  • I wear much heavier eyeliner on a regular basis and draw in the eyeliner all the way under the lower lashes as well. If you want a more dramatic look, you can try this!
  • Now this is the easy part! Just fill in all the blanks. :)
  • Now fill in your water line with a kohl pencil and don't forget to tightline the upper lash line as well, this will make all the small spaces that your brush couldn't reach disappear!
  • Next! Mascara baby! You can curl your lashes before, I haven't because a. I'm lazy and b. I'm resourceful aka I have a curling mascara. XD
And you're done! 

Makeup used:
Eyeshadows: Gaze and Click from Lancome (I know what you're thinking, "what about the cheapness??" They were gifts. :P)
Eyeliner: Maybelline's Lasting Drama Gel liner and brush, but you can use liquid or pencil too, whatever works for you!
Kohl: Maybelline Colossal Kajal :D
Mascara: Maybelline Hypercurl

What can I say, I loves me Maybelline!
Just an FYI, this is what my liner usually looks like, if you want to try it. I know it is a bit heavy for everyday use for most people but I like it. :) 
A bit messed up because it was taken after a long day. *yawns*

I hope all the beginners reading this can get some tips from this. :) 
Let me know if you would like to see more tutorials here and if you liked this one! If you're already an eyeliner pro, I would love to hear some tips! :D