Pages

Thursday, April 26, 2012

My Wedding Attendee Make up

You can also call it my, "Loo scrubbing look." Yes, I'm so glamorous, I scrub bathrooms with make up on! LOL! Anyway, you'll find out more about that in my primer review.

Speaking of primer, why don't make up artists in weddings use any?! I don't get it! That poor bride had her liner melt off and smudge under her brow.. And you can't mention it either.. AWKWARD! That lady has to stand under blazing hot lights and have her every move scrutinised by a camera (or three), the least that dumbass make up artist can do is put on some primer! #end rant.

Anyway, this was the look I did, I had around 20 minutes to get ready so I had to do something fast.. SO, I used the easy smokey eye idea and played with it. Here's how it goes:

Step 1: After priming, fill in the outer third of your eyes with black pencil, preferably waterproof.


Step 2: Smudge it inwards but not all over the lid and make sure the outer corner is still the darkest.

Step 3: Pat on a purple/ plum eyshadow all over the eye till the crease and before the inner corner.

Step 4: In the inner corner pat on some gold shadow, you can use both shadows on the lower lid as well.

Step 5: Sweep on a bronze shadow above the crease.

Step 6: Blend the bronze into the inner corner. And blend the bronze above the crease, upwards. You can use some gold to blend it out as well.

Step 7: Using a black gel/ pencil liner draw on a simple winged liner. Also tightline and line the water line.

And done! Very simple and fast and great for formal occasions. :)

I'm really loving that you guys are giving me requests! Keep them coming! ♥

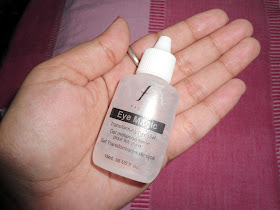
Faces Eye Magic, Transforming Eye Gel Review

You know what really stands out when I read the name of this product? MAGIC. Yes, it really is! Just from that, you know this review i going to be a really positive one. LOL! Seriously, this stuff is aah-mazing! But wait, you're probably thinking WTF is this stuff? D: So, let me explain:


Eye Magic is *supposed* to be a gel that turns all your liners, shadows and pigments into water proof, smudge proof liners. THAT is the main objective... BUT, I didn't think it was magic for that reason, it does that reasonably well but something like Duraline by Inglot looks much better.

What this baby is amazing for, is for being a seriously, super kickass eyeshadow primer!
Yes, at Rs.315, it is the cheapest and the most "magical" primer you will find.
"My mommy says I'm special."
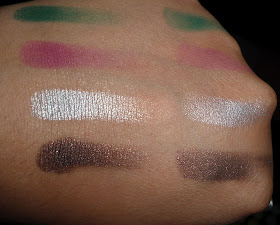
Here are some swatches I did with it:

My chalkiest shadows: Right has the Eye magic
Random shadows: Eyemagic on the left

Same as above, rubbed hard with towel.
Not bad right? But wait some more! Yes, I know I sound like a salesperson on TV. -__-
Anyway, the ULTIMATE TEST!
I did my eyes and then spent the next hour and a half scrubbing the bathrooms.. So water, detergent, sweat was everywhere! Lets see what happened then. :D

Fresh make up

Make up after laborious house work
It didn't crease, spread or disappear after scrubbing LOOS! What other reasons do you need? GO AND BUY IT! LOL!

Even the swatch on my hand still remained after scrubbing.


Even though I say buy it and I will totally buy it again, I'm going to do a pros and cons list:

Pros:

  • Good for priming eyes
  • No creasing
  • Doesn't let make up spread or disappear
  • Makes colours more vivid
  • Great value for money
  • Bottle will last forever, you only need a drop. 
Cons:
  • Not available everywhere, I've seen it at the Faces store, not at counters, you might if you're lucky.
  • Not a good transforming gel. I.e. Not so great at turning your eyeshadows into liners and such.
Verdict: Will definitely buy again if I have to!

If you liked my eye look, it was one I did for a wedding a few days ago, if you want to know how I did it, check out my tutorial. Bye!

Monday, April 23, 2012

Manicure Monday: Miss Claire Galore!

Since you already know how much I've been bitching about how much work I've been swamped in, I'm not going to go there again. But due to lack of time I have had the most hideous nails ever! And I didn't want to keep them that way... So, what's the best way to have nail art on the go? Crackle polish of course. :)

One of my favourite crackles is Miss Claire. I hunted through Mumbai for a cheap crackle polish and after encountering prices like 400-500 INR, I was giving up hope, till I found Miss Claire crackle polish at Beauty Center, Khar! Only 150!! *joyful spazzing*
The pink is a normal polish I used for the mani.

This crackle is really good, and it comes in a variety of colours! But since I had already ordered a couple of coloured ones from beautyjoint.com, I decided to go for black.

At first, I applied it and I was a bit disappointed because even with top coat it looked very gray. :( But soon I realised it was because I was using a quick dry top coat, with a normal top coat I found it was the blackest black. And we lived happily ever after!

Pros:

  • Good quantity
  • Great price
  • Doesn't get chunky over time *cough OPI cough*


Cons:

  • Stays grey when used with quick dry top coat.


The pink I've used under the crackle is also a Miss Claire colour, same price and officially my favourite pink! It's slightly neon and chips only after 4 days, miraculous for someone like me! I've also used it in this cute manicure. ^u^

I also want to say thank you! I have 50 followers now! YAY! Even though I've been such a flake with my posting! I love you guys! ♥ *thinking of doing a giveaway soon*

Friday, April 20, 2012

Try and Follow Me Eye Tutorial: K-pop Inspired ^u^

I really love K-pop! Like, REALLY love it! It's the kind of thing that bombards your senses till you're totally caught up in it. The music is catchy and will get stuck in your head even if you don't like it, and visually, every backdrop, costume and hairstyle is always OTT. So, it is obvious, the make up will be awesome too!

That's why I've decided that I'm going to start doing K-pop inspired tutorials, now and then.. Maybe a few anime ones as well! :D I thought of this especially because the Korean eyes are very different from Indian eyes so  had to change the look around a bit to suit me. Not a lot, just a bit.. And, I think if anyone is interested in these looks, they will help them. I also want to do other celebrity looks, so if you guys have any ideas, let me know! :)

So, lets get started! My first look is going to be from a song called Try and Follow Me by 2NE1, one of my favourite videos, because storm troopers! :D This is the original look:
Park Bom from 2NE1


Step 1: Using a white eye pencil/ shadow base, cover the eyelid and blend Blend some on the corner of the lower lid as well. So we have a base. I used NYX Jumbo Pencil in Milk


Step 2:  Sweep on a baby blue shade on the outer half of the eyelid, blend into the crease.


Step 3:  Next, use a silvery shade and pat it on to the middle of the eye lid, blend into the blue and the crease.


Step 4: I accidently (is accidently not a word? I keep getting spell checked! D:) skipped photographing a step. -__- So this is a two in one. In the inner corner and outer lower corner blend in a white shadow. Above the inner corner blend in a baby pink. The pink will make the look more fresh and not dull..

Step 5: Now for the fun bit! EYELINER! Make a dramatic winged liner, use my tutorial if you don't know how... Although if you don't know how this tutorial's gonna be a real bitch soon. D:

Remember to stay within the eyebrow!


Step 6: Leaving some space from the corner of the eye, draw a line parallel to the flick of the top lid liner. Then bring it down to the water line in a similar way to the top lid. This bit takes some time so have some patience, a q-tip and some make up remover with you. :)


Then fill it up! Fill in your water line, leaving the same gap at the corner and tightline!


Step 7: Fill in the white as shown..


Load on the mascara! And done! :D I wish I had some fake lashes for this look. Maybe I'll buy some. :/


Here's the full face. Use a pink blush and a soft pink lipstick. :) I used NYX round lipstick in Blush.. That died on me because of the heat, because of which I got another tutorial to make. -__-


I hope you enjoyed this tutorial, you can check out the music video too, their style is EPIC!

Do give me your requests and ideas for looks! See ya!

Tuesday, April 17, 2012

7 Deadly Sins Of Beauty Tag

I've been so busy this week, I haven't got any time to myself and I feel so guilty not uploading stuff. I missed Manicure Monday too! Well, I didn't have a great manicure anyway because of work. :( Oh well, I'll do a polish review instead, this week. :) 


So I got tagged for this 7 Sins of Beauty tag by Puja from Cute Nails! You HAVE to check out her blog, it is awesome!
So, here I go:


Q1. What is your most inexpensive beauty product you love and why?
       Anything Maybelline! Especially the Colossal Kajal. For 150INR, you get a smudge proof, water proof kajal? I'm in! And NYX round lipsticks, whenever I shop from US sites, I add one to my bag. :)


Q2. What is your most expensive beauty product you love and why?
       I would say my perfumes, I don't spend like crazy on make up but I do love perfumes! My favourites are J'adore by Dior, Paco Rabbanne pur Elle and ever favourite Davidoff Coolwater! :D


Q3. which beauty product you have love and hate relationship with and why?
       Erm... Foundation! I am never consistent in applying it right! It either looks perfect or it looks like a mask, I can never get it right! I'm still to find a good foundation for my skin, it's still out there. :(


Q4.What is your most delicious beauty product?
      Mmmm.. The Body Shop's strawberry body butter and the Spiced Vanilla lipbalm. first one makes me think of ice cream and the balm makes me think of carrot cake with cream cheese frosting. *drools*


Q5. Which product you neglect due to laziness?
       Body lotion usually, only in the dead of winter when my skin is flaky and itchy, break out the lotion. :P


Q6. What traits you find attractive in opposite sex?
       For physical traits I like lean guys, nice arms and guys who are clean, by my standards, not guy standards. And in personality traits, I like guys who are comfortable with their feminine side and aren't ashamed of it. :)


Yes, I have a type heheh..


Q7. What items you would like to receive as a gift?
       SHOES! A Samsung Galaxy S2 ;A; or a shopping spree, no questions asked! Man, I'm shallow... LOL!


I tag whoever's reading this! Do it! It's fun. :D 
I'm going to try and put up a tutorial this Thursday. :) I'll be free in a week or so to post again regularly. Till then buh-bye!


Disclaimer: I have used images from various site in this post, if you own any of these images and want them taken down, let me know. :)

Friday, April 13, 2012

Enchanting Green: EOTD Tutorial

Hi there! I'm sorry I didn't get this post up yesterday, I've been and still am insanely busy with work but I'm still going to do my best to get posts up. :)
The eye look I'm doing today is a very simple and sophisticated look but it's summery as well. :) Great for a night out.
The colours I'm primarily using are green, gold and copper. I'm using my Coastal Scents palette but you can use whatever similar colours you have, play around with it. :)

This is the finished eye look:


So, let's start!

Step 1: Clean and prime! Then right above your lash line, halfway to the crease pat on a coppery eyeshadow.
All the late nights are really showing, eh?
Step 2: Right above the copper, upto the crease, sweep on some dusty gold and blend the two.


Step 3: My camera hasn't picked up the colour very well, but on the crease, like shown, blend on some light yellowy  green, blend it out well and also into the gold.


Step 4:  On the outer corner of the crease, pat on a dark green and blend into the rest of the crease. Keep the colour intense in the corner though.


Step 5: Highlight the brow bone and inner corner of the eye with a gold shadow. I also lined my lower lash line with a copper pencil, you can use the same copper shadow, if a pencil is unavailable.


Step 6: Give a winged line to the eye with a gel or liquid liner. You cn find the tutorial here. Water line and tightline your eyes and don't skimp on mascara!


And done! Pair with nude or pink lips!


I hope you enjoyed this simple, classy and earthy look! I'm sorry I have to cut short now, I had so many things to talk about, but later.. I just found out my wallet got lost and someone found it, so i have to go pick it up! What luck!
Anyhoo, please leave your comments, I always love them! And also, if there are any looks that you guys would like to see me do tuts on, let me know in comments or on Facebook! Gotta go! Bye~